
Fruit Tree Site Selection, Planting, & Aftercare
A guide to getting your tree into the ground.
BRINGING HOME BABY!

So you bought a fruit tree and managed to get it home unharmed. Congratulations on your new arrival! Now what? Your tree has likely arrived in one of two ways:
Potted: In a temporary nursery pot with soil.
Give it a thorough watering, find a protected place that stays above freezing where it won’t be damaged by people or pets. Keep the soil damp until you have finished this blog post and are ready to plant.
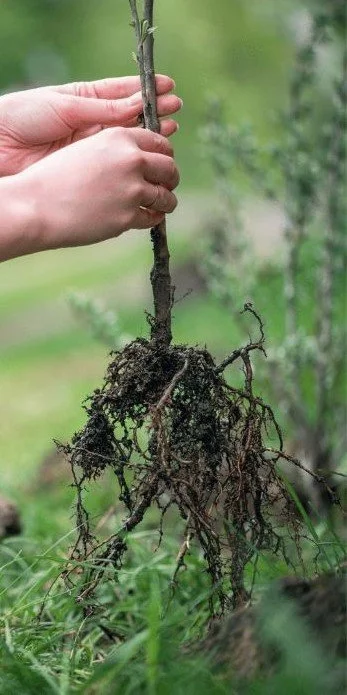
Bare root tree.
Bare Root: No pot & no soil.
It looks like a dormant stick with some roots dangling off the bottom - eek! Don’t worry, this is a common way for plants to be sold, especially when shipped in the mail.
Find a container with drain holes, fill part way with damp sawdust, wood shavings, or loose soil.
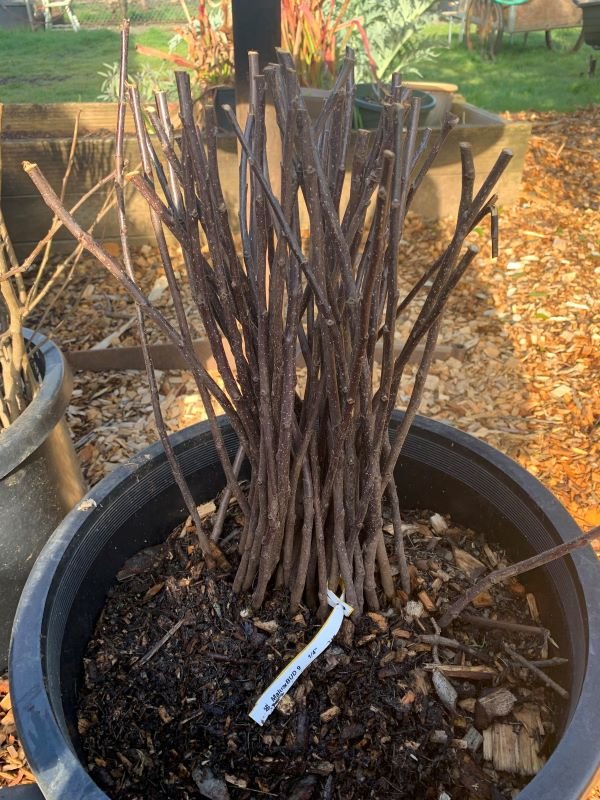
Many bare root trees being stored in one pot.
Place your trees on top and gently add more until the roots are covered.
Set the container in a protected place that stays above freezing, where it won’t be damaged by people or pets. Keep the medium damp until you have finished this blog post and are ready to plant.
If you have multiple bare root trees, you can put them all together in one container, they do not each need to be stored in separate pots.
Why Buy Bare Root?
Most home gardeners will choose and pay more for a potted plant over one that is bare root in a nursery. This is usually because they aren’t really sure what a bare root plant is or what to do with it when they get home. However, savvy shoppers know there are advantages to buying bare root!
Price: Bare Root plants are often cheaper because they require less labor and materials on behalf of the nursery.
Root Health: There is no chance for a bare root plant to become root bound from sitting in a small pot too long. This means less corrective work for you, which we will talk about later in this post.
SITE CONSIDERATIONS
Next, let’s talk about where to plant. We know you’re excited to get your new tree into the ground, but slow down, take a breath, and make sure to choose the right spot first. Proper site selection may prevent a host of problems down the road.
Choose Full Sun

Most fruit trees produce best when placed in “full sun”. This means at least 8–10 hours of sunlight each day. Look up the specific light requirements for each plant you bring home and take the recommendation seriously. While your tree may be perfectly healthy in partial shade, don’t expect optimal fruit production and keep in mind that some trees won't bear any fruit at all with adequate sunlight. If your only option is a shady spot, consider swapping out that sun loving fruit tree for a shade loving berry or choose a different edible shade loving plant.
Avoid Frost Pockets

Although fruit trees require adequate airflow throughout the canopy, avoid planting in areas that receive very strong winds or locations in low lying or sheltered spots with stagnant airflow where cold air settles to create frost pockets.
Good Drainage
Most fruit trees do not tolerate having “wet feet” so good drainage is important. If you don't have a site with soil that drains well, consider planting in a raised mound or bed.
Access To Water

A tree that is not drought stressed, is better suited to protect itself from pest and disease pressures, and your new tree will benefit from regular watering for at least the first few years while roots become well established. So consider - does your chosen site have easy access to water? Be realistic about how likely you are to provide thorough watering if it means hauling buckets back and forth.
Fencing
Local wildlife is just as excited about your new tree as you are! Do deer or other large creatures visit your planting site? If so, is the site properly fenced? If not, does the terrain make it possible for you to add fencing or sturdy cages around each tree? One deer can eat a young tree to the ground, break branches, or rub bark to the point of killing the tree. Have a protection plan in place before you plant. If physical barriers are not possible, consider growing trees on full sized rootstock. However, they will still need to be well protected for a number of years until they reach a mature height out of a deer’s reach.
Utilities & Party Poopers

Make sure there are not utility lines or septic leach fields crossing your potentially perfect planting place.
Septic Leach Fields: If your home relies on a septic tank for waste removal, you likely have a septic leach field. For the safety of your food as well as your septic infrastructure, trees should be planted at least as far from the leach field as their mature height. For example: If your tree’s mature height is 20’, then plant your tree at least 20’ away from the edge of the leach field.
Utility Lines: Overhead utility lines are easy to see, but nowadays many utility lines are located just below ground. If you aren’t sure where your utility lines run, “call before you dig” to prevent a dangerous or costly mishap.
Consider Your Neighbors: Planting a tree that drops a fruity mess can cause drama, so don’t assume your neighbor will appreciate fruit over their fence line. With any luck, they will be thrilled to pick apples and pears in their own yard but it may be worth it to ask first.
WHEN TO PLANT:
Potted Trees:
We highly recommend planting in Early Spring or Late Fall so your tree has time to become established before stresses of summer or frozen ground of winter. Our favorite time to plant is fall, because here in the Pacific Northwest, nature takes care of the watering for many months, and the tree will get a jump start come early spring.
Bare Rooted Trees:
These should be planted while they are still dormant, or soon after you buy them. Most nurseries will ship bare rooted trees at the appropriate time to plant them. If you can’t get them into the ground right away, you may plant them into a large pot or container before they start to wake up and push new growth.
Newly grafted trees:
If the tree you are working with a baby tree that is newly grafted, consider keeping it potted throughout its first spring & summer before planting out in late fall or even the following spring. It is much easier to protect a delicate graft union until it is completely healed if your tree is in a safe space.
ASSESS THE ROOTS
Before we put that tree into the ground, lets make sure it is not root bound.

If your tree came bare root, you don’t have to worry about this - wahoo! If your tree came in a pot, don’t’ skip this step - it’s important.
Take a look at the roots. When you remove the tree from the pot, and gently shake or tease the soil away, do the roots come loose and spread out, or does the entire solid root mass hold strong in the shape of the pot like in the photo shown here?
If the roots are tightly wound up in the shape of the pot, your tree is rootbound and you will need to remedy this before planting. If you plant it as is, the roots may end up encircling the tree causing stunted growth or death.
How To Save A Rootbound Tree
If your tree is only slightly rootbound, you may be able to tease the roots apart after soaking them in a bucket of water for a few hours. If this is the case, great. You can move onto the next section and get that tree into the ground!
If your tree is matted with roots that won’t come loose after soaking, we suggest using the box cutting technique, explained here. Don’t worry - you won’t hurt your tree by removing part of that root mass. Remember that your potted tree still has 100% of its root system intact, compared to nursery dug or bagged trees that already had a good percentage of their roots removed. The roots will grow back.
DIGGING YOUR HOLE

How Big To Dig?
We like to dig our hole 2-3 times as wide as the roots of our tree spread out. When the hole is filled, the very top of the roots should be just below the soil and the root flair if there is one should be just above the soil. For now, hold your tree up inside of the hole while digging to figure out the approximate depth, and be sure to read the Time To Plant Section below for important notes about what parts of the trunk need to be buried and what should definitely stay above the soil line.
Got Clay?
Here in the Pacific Northwest, most of us have soil containing a high percentage of clay, and you may notice that your shovel creates a slippery wall around the outer edges of the hole. If this is the case, it can help to “rough up” the perimeter to make the surface more inviting for growing roots to penetrate.
What To Fill The Hole With?
Fertilizers, composts, potting soil, amendments, oh my! Should any of these be added to your hole?
Surprise - NO!

In most cases, it is best to plant your tree directly into native soil and here is why:
If you fill your planting hole with rich fluffy goodness that is lighter and more delicious than the native soil surrounding it, the tree’s roots are unlikely to leave the hole, and you will end up with a tree that is poorly anchored and not well adapted to the native soil surrounding the hole. Additionally - soil amendments that promote vigorous top growth before the roots are well established can cause your tree to collapse, so be patient and give your tree a chance to adapt to the native soil already there.
If you decide you really need to fluff your soil up a bit, we recommend retaining at least 75% native soil in the hole. Mulches and composts can be added later, but are best applied as a topdressing over the soil as opposed to mixed in with it.
TIME TO PLANT!
Finally! If you haven’t already, place your tree into a bucket of water that covers the roots and let it soak for a few hours before planting. If your tree is potted, remove the pot first and make sure you read the section above about making sure it is not rootbound. After those roots are thoroughly hydrated, it's time to plant.
Make a small mound in the middle of your planting hole
Place your tree on top of the mound and spread the roots out over it.
Slowly add soil while gently wiggling the tree up and down to help the soil settle between the roots. Tamp the soil in gently as you go.
When the hole is filled:
The crown (top of the roots) should be at or just slightly below the surface of the soil.
The graft union should be should be 4-6 inches above the soil line. Not all trees will have a graft union but many will. The graft union will be recognizable as a bulge or a drastic change in color on the trunk a few inches above the roots. If you bury this union, your tree may send out roots from the upper portion of the tree and lose the desirable characteristics provided by the rootstock, such as dwarfing qualities or disease resistance.
The root flare should be above the soil. Older trees may have what is called a root flare and this needs to breathe.
The final soil level in the hole should be slightly higher than the ground level outside of the hole.
Let It All Sink In…
Water the entire planting hole thoroughly, paying extra attention to the soil. Over the next few waterings, the soil will settle and sink a bit. You want your tree to sit a tiny bit above ground level as opposed to in a sunken area. Did it sink down too much? Did your watering expose the top of the roots? Does the tree still feel firmly planted? Make adjustments as needed.

SUPPORT & PROTECTION
Your new tree is finally in the ground - hooray! But before you walk away, there are a couple more important steps. If you skip this part, your tree may not look quite the same in the morning.
Staking
All newly planted trees should be staked for support. For some trees, the staking is only temporary, but for others the support will need to stay for hte entirety of it’s life.
If your tree is growing on dwarfing or semi-dwarfing rootstock and is not trained to a trellis, it will probably need that extra support for most if not all of its life. Rootstocks that keep your tree small, also often require a bit of help to stay upright. It’s a fair tradeoff.
Your support doesn’t need to be elaborate.
Pound a couple 6’-10’ stakes or posts about 2’ feet into the ground, approximately 18” away from the tree.
Attach the tree to the posts using wide smooth flexible material of some kind. Avoid placing wires or cables directly in contact with the trunk because they can rub, girdle, or cause other damage. Examples of suitable materials are things like: wide canvas strapping, bicycle inner tubes, or other soft wide products made specifically for tree tying.
* Make sure not to tie the tree too tight. Allowing just a little bit of movement will help strengthen the trunk and roots, but don’t let it sway back and forth too far. If there is too much movement, a little valley will be created around the base of the tree that can collect water and rot out the trunk.
Install Your Tree Cage
Remember when we talked about deer fencing and cages in the Site Selection section? Well this is your reminder to get your tree cage up quickly if your site is not fully deer proof. Don’t procrastinate here or you may learn a lesson!
MAINTENANCE & AFTERCARE
Fertilizing & Soil Health:
As you learned in the planting section, we don’t recommend using fertilizer or anything that will boost nitrogen at the time of planting or immediately after. Allow the roots a chance to settle in and become established before dressing with anything that promotes vigorous top growth. If you MUST top dress your newly planted tree with fertilizer, a well rounded 3-3-3 fertilizer or something similar should be fine in spring as the new growth begins.
DO NOT:
Fertilize in the fall. Fertilizing late in the year promotes tender new growth that doesn’t have time to harden off and will likely suffer frost damage.
Use tree spike fertilizer sticks. First of all, they only reach the specific area around the spike, and second, most are not organic / are often filled with icky ingredients we wouldn’t recommend using around your food plants.
DO:
Sprinkle lime on top of the soil. Lime helps raise the ph level a bit while also providing magnesium and calcium to the soil. Focus on the entire area - not just directly over your planting hole.
Apply high quality compost or other mulches on top of the soil (but kept away from the base of the tree).
Spray your tree with compost, worm casting, or kelp teas - or apply them topically to the soil.
Watering
Slow, thorough, intermittent watering encourages roots to dig deep, and you want your tree to develop well anchored roots that are able to seek out moisture during times of drought.
Weather conditions will play a huge role in how much and how often you will water, but in general - plan on around 3-5 gallons a week, spread out between two different visits.
Try to stop yourself from sprinkling your plants with the hose every time you walk by. They shouldn’t need watering every day and that quick sprinkling only encourages the roots to stick near the surface.
Consider Vole (and bunny) Protection
Voles love to burrow in long grasses and heavy mulches at the base of trees. They cause extensive damage by nibbling away at roots or chewing the bark, leaving your tree completely girdled, and they are particularly fond of the roots of young trees - yippee!
Eliminate Habitat - Keep grasses, weeds, and mulch low and pulled away from the trunk of your tree.
Physical Barriers - A trunk wrap made of hardware cloth (metal mesh) will help keep voles from girdling young trees. The wrap should be large enough to accommodate a few years of trunk growth, be approx 18-24” tall, and buried about 4-6” inches into the ground.
Support Natural Predators - While you may not want them near your hen house, birds of prey such as hawks and owls hunt voles, as do raccoons, coyotes, snakes, & weasels.
Traps - The use of individual traps may not make a huge difference in an orchard overall, but can provide a little protection for individual trees.
Don’t Forget To Label or Map Your Trees!
Plastic nursery tags will not last forever and “permanent” markers are not really permanent. We like to use self etching metal tags, or recycled metal mini blinds and an engraving pen for labels. Whatever you use, make sure it’s waterproof and well attached.
An alternative to labeling is mapping. Keep a labeled map of your trees on paper, computer, or both!
CONGRATULATIONS!
Your tree is safely in the ground, protected, labeled, and you know how to support the health of the soil around it for the first year. We wish you the best of luck! If you’d like to learn about pruning your new tree, or pest & disease prevention, please join us in the HOEC Community Orchard for a hands on workshop this year!
If you have additional questions, or ideas for future blog posts, feel free to email us @ volunteer@homeorchardeducationcenter.org
UPCOMING WORKSHOPS


